You are here: Using TRIOS Software > Using TRIOS File Operations > Importing and Exporting Data
Importing and Exporting Data
Importing Data
TRIOS allows you to easily import .txt, .csv, and .prn files via the Text Import Wizard. The data import functionality has the ability to import a data file even when the instrument is offline, and only is available to the currently connected instrument.
Only one step tests are currently supported.
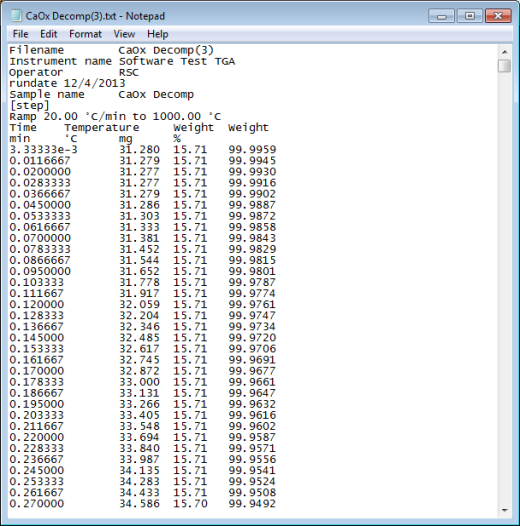
- Open the desired data file in a document. The Text Import Wizard displays.
- NOTE: Changes made in the Wizard are displayed in the Data Preview section. Text files can include any type of data (such as rich text), but only numerical data will be imported.
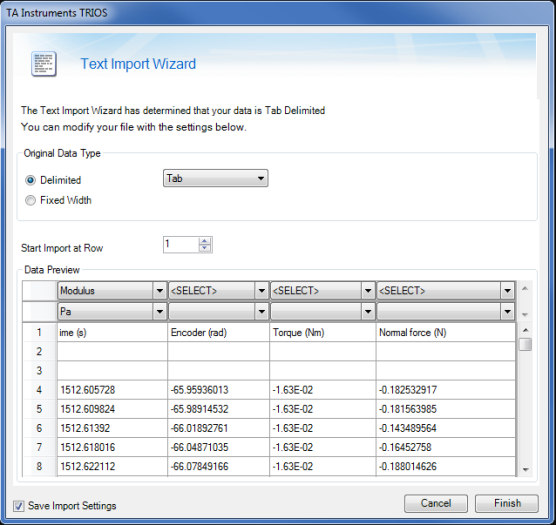
- Select the Original Data Type:
- Delimited: The data values within the file contain embedded delimiters (characters that separate the words, phrases, or numbers). Specify the character type: Tab, Semicolon, Comma, or Space.
- Fixed Width: The data values contain no embedded delimiters so that each column has a fixed width (up to 10 characters).
- Select the row at which the data import should start.
- Select the column variables. Any column with unspecified variables will not be imported.
- Select Save Import Settings to have your import settings remembered, or deselect this option to specify your preferences with each import.
- Click Finish to start the import.
Exporting Data
TRIOS allows easy export of images (graph) and data tables (spreadsheet) to the clipboard or to a file from the document view. Multiple file export can be performed directly from the File Manager using various formats without opening the files in a document view. Consult the information below.
- NOTE: See Using the Camera for instructions on how to export camera images from TRIOS data files (Rheology only).
- Click here to watch a TA Tech Tip on exporting data from the TRIOS software. Note that the video is recorded using Discovery data, but the steps apply to all instruments using TRIOS software.
Copying a Graph to the Clipboard
Graphs can be copied to the clipboard by the following method:
- Open the desired file.
- Display the desired graph document.
- Copy the graph image by right-clicking on the plot and selecting Copy.
Copying Spreadsheet Data to the Clipboard
Any range of data can be copied to the clipboard from the spreadsheet and pasted into another application. Follow the instructions below:
- Open the desired file.
- Display the desired spreadsheet document and select the desired data, following the instructions in the table below.
Copy Actions
| Copying an entry |
Select the entry. Right-click and select Copy from the pop-up menu. |
| Copying a column or row |
Click in the header above a column to select the column, or click in the numbered column to select the row. Right-click and select Copy from the pop-up menu. |
| Copying multiple cells |
Select multiple cells in a column or row as explained above. Right-click and select Copy from the pop-up menu. |
Back to top
Exporting Data to a File
To export a single TRIOS data file from the document view, follow the instructions below:
- Open the desired data file in a document.
- Select the desired tab or view (graph, spreadsheet, etc.). Note that the export options available depend upon the currently-viewed step.
- Click the TRIOS button
 in the upper left corner of the main window. A drop-down menu displays.
- Select Export and choose one of the following options:
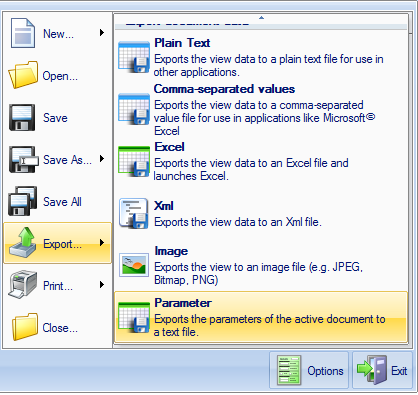
- Plain Text: Exports the data to a view data to a plain text file for use in other applications.
- Comma-separated Values: Exports the view data to a comma-separated value file for use in applications such as Microsoft Word.
- Excel: Export the view data to an Excel worksheet. Note that the Excel export function does not work with Excel Starter Edition.
- XML: Exports the view data into an XML file (see below for more details)
- Image: Exports the view to an image file (.png, .jpg, .tiff, .bmp)
- Parameter: Exports the parameters of the active document to a text file.
- Make the desired selections in the export and execute. For more information regarding the selections to make in the dialog box, continue to the section Export Dialog Selection.
Back to top
Export Dialog Selection
The export dialog box that displays depends on the type of export selected: Plain Text, Comma-separated values, Excel, and XML. Note that when Images is selected, no dialog box displays.
Plain Text and Comma-separated Values
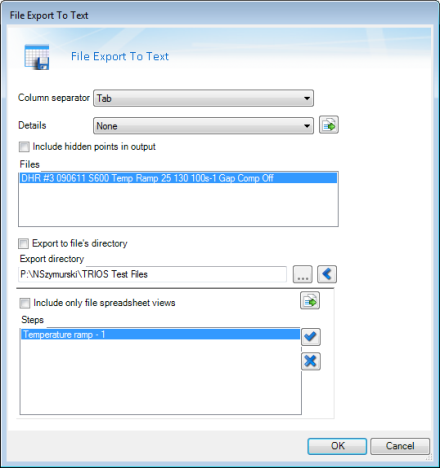
- In the Column separator drop-down list, select Comma for comma-separated values or Tab for plain text.
- In the Details drop-down list, select the additional details to be included in the file. Choose between None, Headings only, or Heading and notes. Click
 to apply the selection to all files in list.
- Select the Include hidden points in output checkbox, if needed.
- The Fileswindow lists all potential files for exporting. Click a filename to configure the export options to be applied to that file.
- Export to file’s directory: Select this checkbox to export each file to the same directory where the original data file is located (default selection). Deselect the checkbox to specify a directory to which to export. Click
 to browse for a directory.
- Include only file spreadsheet views: Select this checkbox to export only those steps that currently appear in spreadsheet views for the file. Deselect to choose which steps to export. Select to have selection apply to all files in list.
- Click
 to select all steps.
- Click
 to deselect all steps.
- Hold down the Ctrl key to select multiple steps.
- Repeat each step as necessary for each file.
- Click OK to finish.
Back to top
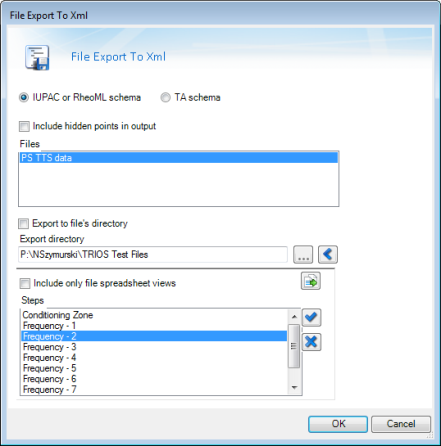
XML
The exchange of data between software products and test instruments suffers from a non-standardized file format. Due to different specification requirements, data types, and test methods, a fixed row- and column-based table format is not appropriate. The XML (eXtensible Markup Language) format offers far more flexibility. XML has an essential benefit; it is system and software independent.
The XML format is a tree-like structure with freely defined keywords, which can be perfectly adapted to the structure of the test data. Usually the XML file content is presented in a viewer-friendly way based on a so-called Schema Definition (XSD-File). The structure is flexible and can be extended by introducing new elements without making old data files invalid.
The two Structure files available are the RheoML and the TA schema. The RheoML structure is designed for rotational rheometer and capillary data. The TA structure file exports the data of all TAI instruments including Rheology and Thermal Analysis instruments.
- NOTE: TA Instrument supplies XML stylesheet files for easy viewing of TRIOS-generated XML exported files. These files are located at C:\Documents and Settings\All Users\Application Data\TA Instruments\TRIOS\Xml Schema (for Windows XP) or C:\ProgramData\TA Instruments\Trios\Xml Schema (For Vista or Windows 7 and up). The associated schema file needs to be located to the same directory as the XML file you are trying to view. For Thermal results files, copy the file IUPAC2html.xsl for the IUPAC schema or TAThermal1html.xsl for the TA schema. For Rheology results files, copy the file RheoML2html.xsl for the IUPAC schema or TARheology1html.xsl for the TA schema.
- Select the structure of the exported XML file: IUPAC or RheoML schema or TA schema.
- Select the Include hidden points in output checkbox, if needed.
-
The Fileswindow lists all potential files for exporting. Click a filename to configure the export options to be applied to that file.
- Export to file’s directory: Select this checkbox to export each file to the same directory where the original data file is located (default selection). Deselect the checkbox to specify a directory to which to export. Click to browse for a directory.
- Include only file spreadsheet views:Check this option to export only those steps that currently appear in spreadsheets within the document. Steps that are not on a current spreadsheet will not be exported. The variables included for each step will match the spreadsheet on which it appears. Uncheck this option to export all steps within the document. The variables included for each step will match the current user default spreadsheet variables for the step’s test type.
- Select to have selection apply to all files in list.
- Click to select all steps.
- Click to deselect all steps.
- Hold down the Ctrl key to select multiple steps.
-
Repeat each step as necessary for each file.
- Click OK to finish.
Back to top
Excel
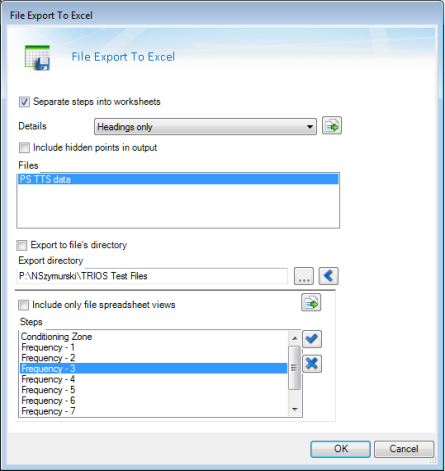
- Select whether steps are separated into individual worksheets or not.
-
In the Details drop-down list, select the additional details to be included in the file. Choose between None, Headings only, or Heading and notes. Click to apply the selection to all files in list.
- Export to file’s directory: Select this checkbox to export each file to the same directory where the original data file is located (default selection). Deselect the checkbox to specify a directory to which to export. Click to browse for a directory.
- The Fileswindow lists all potential files for exporting. Click a filename to configure the export options to be applied to that file.
- Select the Include hidden points in output checkbox, if needed.
- Include only file spreadsheet views: Select this checkbox to export only those steps that currently appear in spreadsheet views for the file. Deselect to choose which steps to export. Select to have selection apply to all files in list.
- Click to select all steps.
- Click to deselect all steps.
- Hold down the Ctrl key to select multiple steps.
-
Repeat each step as necessary for each file.
- Click OK to finish.
Back to top
Exporting Spreadsheet Data for Multiple Files/Steps
To export the spreadsheet data for multiple files or steps, follow the instructions below:
- Display the File Manager > Results view.
- Select the desired file(s) within the Results pane (this can be individual steps or files).
- Right-click the selected files and select Export… from the menu options.
- Select the desired options: Plain text, Excel, XML, All images.
- Make the selections in the Export form depending on the selected option as follows:
- Plain text: Choose column separators (comma, tab).
- Excel: Select this checkbox to add a new worksheet for each step in the results. Deselect the checkbox to place all steps in a single worksheet. Note that Microsoft Office 2003 or Office 2007 must be installed to use this feature. The Excel export function does not work with Excel Starter Edition.
- XML: Select the RheoML or the TAI schema.
- Images can be exported in .png; .jpg; .bmp; .tiff. format.
- Make the desired selections in the export form and execute.
Exporting Parameters
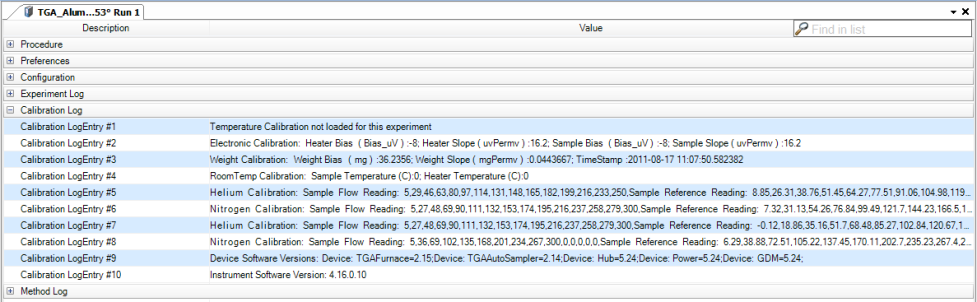
View Parameters
- Display the File Manager > Results view.
- Select the desired file(s) within the Results pane (this can be individual steps or files).
- Right-click the selected files and select Show Parameters.
- The parameters display. Click the + next to each parameter type to view the parameter details for that experiment.
Export Parameters
- Display the File Manager > Results view.
- Select the desired file(s) within the Results pane (this can be individual steps or files).
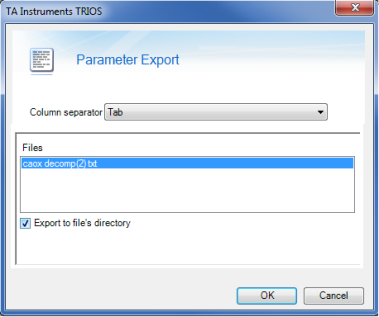
- Right-click the selected files and hover on Export… and then click Parameters...The Parameters Export dialog box displays.
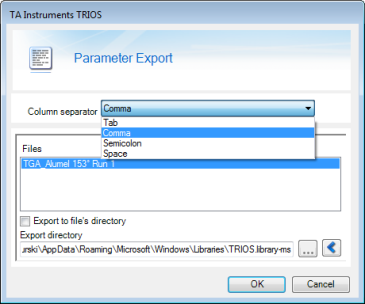
- NOTE: ALL parameters for the selected experiment(s) will be exported.
- The data values within the text file that will be generated contains embedded delimiters (characters that separate the words, phrases, or numbers). Specify the character type: Tab, Semicolon, Comma, or Space from the Column separator drop-down menu.
- Select Export to file's directory to save the generated file in the same directory as the TRIOS file. Deselect this option to browse to a different location.
- Click OK to complete the export.
- The exported file is saved with the same name as the TRIOS file.
Back to top
